A brain dump of things you can do to load React apps faster


This post covers the breadth of tools, options, plugins, presets and settings I use when working on improving performance of React web apps. I had these noted down as rough notes on my local system and decided to convert them into a blog post to bring more clarity to the notes (and my understanding). I also hope these will be of some use to someone trying to improve front-end performance for their React web app:


Where to start


Trimming JavaScript for Fast Loading SPAs : Where to Start

Avoid starting without having a good look at these three things:

  • Top Entry Routes : Know the top entry routes and the amount of JavaScript that loads when opening these routes. Do not look at just the main JS size but total JS that gets loaded for these top entry routes. Keep in mind that initial loading is where most of Single Page Apps slowness exists. Remember that your goal is to reduce the total amount of JavaScript that loads for your top entry routes.
  • Devtools View of Things : Understand how the top entry routes load by looking at the devtools 'Network' tab (and if necessary, 'Performance' tab). If most of the traffic is from mobile devices, do so on an actual mobile device. You need not analyze it right away, but being aware of the timings from these tabs is helpful.
  • Webpack Bundle Analyzer : Get a quick view of what constitutes the bundles - know the biggest contributers to the bundle sizes.

Know the amount of JS that loads on opening your top entry routes through browser's devtools. And, know what constitutes these bundles through Webpack bundle analyzer. Keep tracking these as you optimize.


Analyzing web app bundle through webpack bundle analyzer
A quick peek into Webpack Bundle Analyzer view of your JS bundle can help uncover largest contributors to your bundle size.


Peek into Webpack Bundle Analyzer for low hanging fruits

Start by looking into webpack bundle analyzer for some quick opportunities to reduce the bundle size:

  • Does the bundle contain moment locales that aren't used? Leverage webpack's ContextReplacementPlugin or moment-locales-webpack-plugin.
  • If used, is the lodash package imported correctly?
  • Do you see both lodash and lodash-es in your bundle? Avoid duplicacy through webpack's alias:
    
    // within webpack.config.js
    module.exports = {
      resolve: {
        alias: {
          'lodash-es': 'lodash',
        },
      },
    };
    
  • Are there libraries / modules appearing more than once in your bundle? This can quickly be checked with duplicate-package-checker-webpack-plugin and the dependencies can be understood through 'npm ls'. Since duplication of modules mostly occurs due to version differences, you may have to upgrade / downgrade version of your dependencies to resolve this. Alternatively, you may use Webpack's resolve.alias to route any package references to a specified path:
  • 
    // refer all lodash imports to the lodash instance at node_modules/lodash
    module.exports = {
      resolve: {
        alias: {
          lodash: path.resolve(__dirname, 'node_modules/lodash'),
        },
      },
    };
    
  • Wherever possible, ensure full modules are not imported. These mostly happen due to sub-optimal import statements and can be fixed through babel-plugin-transform-imports:
    
    //within .babelrc or package.json "babel" config
    {
      "presets": [
        "next/babel"
      ],
      "plugins": [
        ["transform-imports", {
          "material-ui": {
              "transform": "material-ui/${member}",
              "preventFullImport": true
          }
        }]
      ]
    } 
    

Uncover code splitting opportunities

This refers to setting up your code in a way that webpack can split it into various bundles in an optimal manner. For code splitting opportunities, look for conditional rendering of stuff:


import ProfileComponent from 'Component/ProfileComponent';
...
...
export class InfoView extends React.Component {
...
...
render() {
...
return (
{showProfileComponent ? (<ProfileComponent />) : null }
          );
} 

In the code snippet above, the ProfileComponent shall only be visible in some circumstances, but will be loaded with InfoView JS bundle every time. This can be optimized to load conditionally through React lazy or loadable-components :


import React, { lazy, Suspense } from 'react';
....
const ProfileComponent = lazy(() => import('Component/ProfileComponent'));
...
...
export class InfoView extends React.Component {
...
...
render() {
...
return (
{showProfileComponent ? (<Suspense fallback={<div />}><ProfileComponent /></Suspense>) : null }
          );
} 

When code splitting a , be aware of the following caveats:

  • Lazy loading a component may also cause it's dependencies to be part of the splitted bundle. Now, if these dependencies are shared with other components - it may impact sizes of other bundles as well. So, it is ideal to try the above approach and keep a watch on how it affects various bundles (through devtools and webpack bundle analyzer).
  • Always watch for the amount of gain from such splitting. If it is single digit KBs, it may be ideal to leave it as is. The best way to know the gain from split is by actually performing it (because of all the dependencies that webpack may bundle together).
  • Another important factor in splitting decision making is how frequently the condition is expected to be true. In above example, if showProfileComponent is expected to be true 99% of the times, the code splitting may not help improve performance.


Setup vendor bundle for caching benefits

Having a separate vendor bundle can help get caching benefits because this bundle is expected to change less frequently. Webpack 4 provides SplitChunksPlugin (and CommonsChunkPlugin for earlier Webpack versions) to setup creation of vendor bundle during build process. That being stated, it is critical to ensure this is setup efficiently for maximum benefits:

  • You may want to use HashedModuleIdsPlugin to ensure the bundle file name hashes change only when bundle content actually changes. More importantly, also test it to ensure it does change when the bundle changes.
  • You may want to use optimization.runtimeChunk to extract the manifest into a separate file to ensure the vendor bundle does not change frequently.
  • If possible, run your SplitChunksPlugin configuration through your last month's releases (or any adequate duration) and check if the vendor bundle hash changes when it should / should not change.


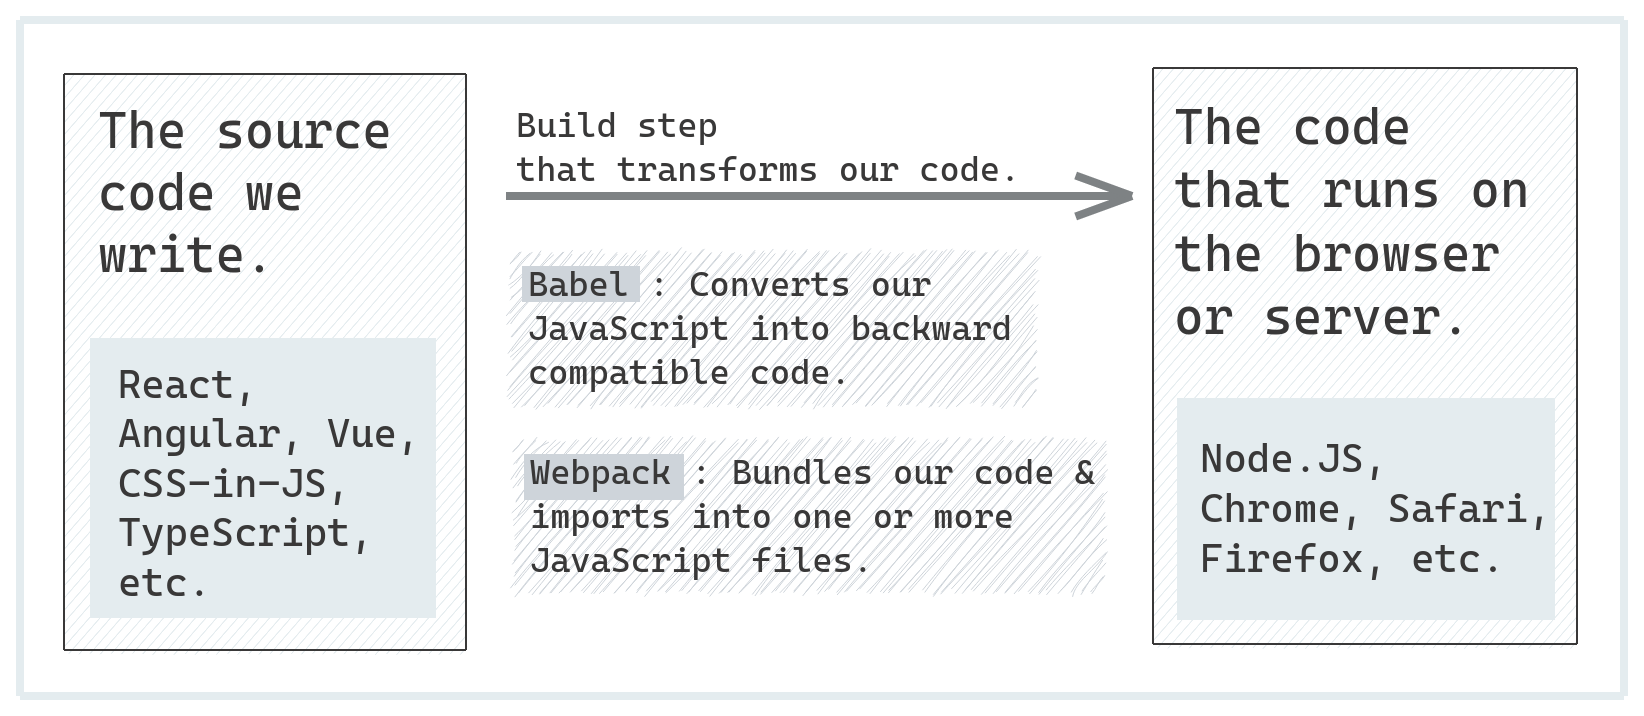
Reduce core-js size with efficient babel transpilation

Babel's preset-env allows you to specify the target browser environments and includes transpiled version of your code only for those environments. You can use this to ignore very old browsers - this shall reduce the size of your bundle. This preset also provides useBuiltIns option. When set to 'usage' (experimental), babel adds specific imports for polyfills only when they are used. This helps reduce the size of your initial bundle.


Conclusion

Improving your React web app's performance can be complex. You can make this exercise effective by constantly tracking the JS sizes for your top entry routes through browser devtools and webpack bundle analyzer. Also, being aware of the wide number of options in improving the performance helps one uncover the top-most optimizations quickly.


Punit Sethi

About the Author

Punit Sethi has been working with large e-Commerce & B2C websites on improving their site speed, scalability and frontend architecture. He tweets on these topics here.